I will spend good money if there is a tool I know I will use. But if there is something I am unsure about, or something I feel is overvalued, I can be extraordinarily frugal. Such is the case with bannetons.
My usual strategy is to wait until I find the thing I am looking for in a thrift shop and then at least I am not offended by the price. Bannetons do not seem to come up in my local thrifts, so I proof boule loaves in various stainless or glass bowls. But when I wanted to bake elongated bâtards, the only thing I could find was a long presentation dish—one of my wife’s treasured (and ludicrously expensive) pieces of Astier de Villatte that she brought back from cooking school. I was getting pretty nervous about dumping bread from this delicate ceramic over a hot iron Dutch Oven—so I created a cardboard banneton.
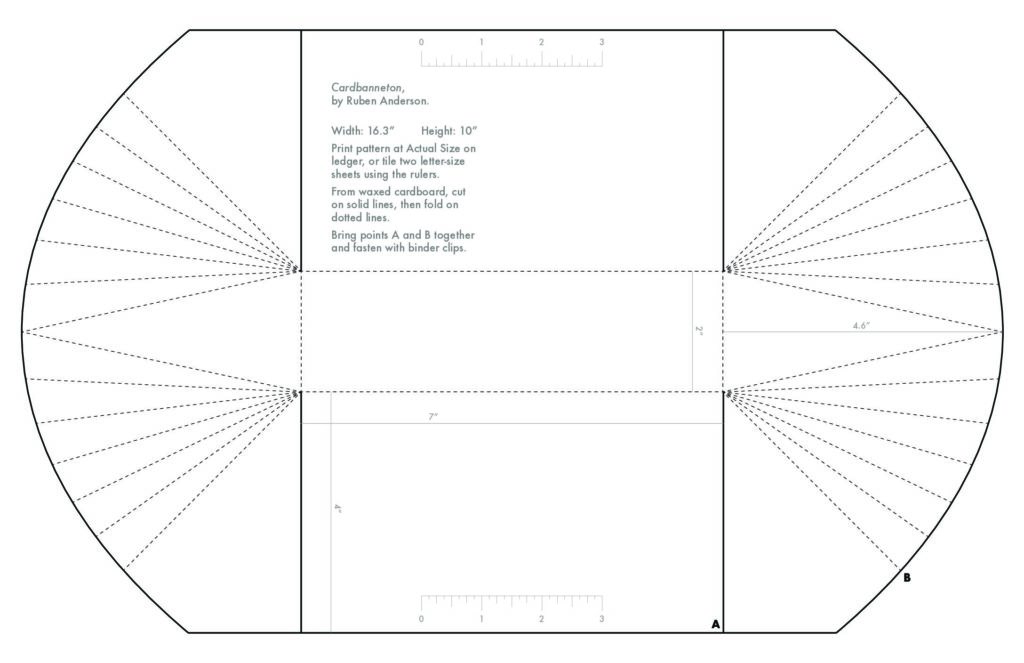
This design nicely holds a loaf made with one kilo of dough, baked in a pan that is about 12” long and 8” wide.
I used waxed cardboard from a green onion box for this banneton. Waxed cardboard is waterproof, which is good since wet dough is proofing in it, and it is stronger than regular corrugated. To my surprise I found it was easier to work with and creased and cut smoothly. You should be able to find waxed cardboard behind a grocery store, or by asking the produce stocker. There is simply a stunning amount of waxed boxes used to ship vegetables around, and it is often just thrown away if there is not a composting system.
Try to find a box without too many drainage and ventilation holes punched in it. I found a green onion box with tall sides and no holes, and even a pretty flower logo.
Print the pattern at Actual Size on 11 X 17 paper, or tile it on to two or three sheets of letter size paper. Use the printed rulers to ensure the paper overlaps in the right spot, and tape them together. Find a spot on your box with the fewest holes and take advantage of the features of the box. For my banneton I chose to lay the pattern across the “grain” of the cardboard. Across the grain is how cardboard kinks most easily, so I was concerned about the long edges buckling. But, I wanted one of the corner folds of the box to become one of the folds between the body and the end of the banneton, so I gave it a try. So far so good—and I can always make another one.
I cut a project like this entirely by just laying the pattern on top of the material and moving weights or stack of books around to hold the pattern in place while I make cuts through both pattern and cardboard. Using a long straightedge, cut both edges to width. Then cut the curved ends, and finally make the four short cuts that free the curved ends from the straight sides. When cutting patterns or stencils on a mat, it is always best to cut straight back towards yourself, so rotate the pattern as needed, or rotate yourself around the table the pattern is on.

Bakers often have a rectangular steel bench knife, and I found it was the perfect tool for folding the waxed cardboard, but you could also use a ruler, or a heavy spatula—practice on some scraps first. Just place the bench knife on the folding line and put your weight on it. Start by working around the rectangular bottom of the banneton, then by doing the radial folds of the ends. While you are leaning on the bench knife, use your other hand to bend the cardboard up to make a very crisp fold.
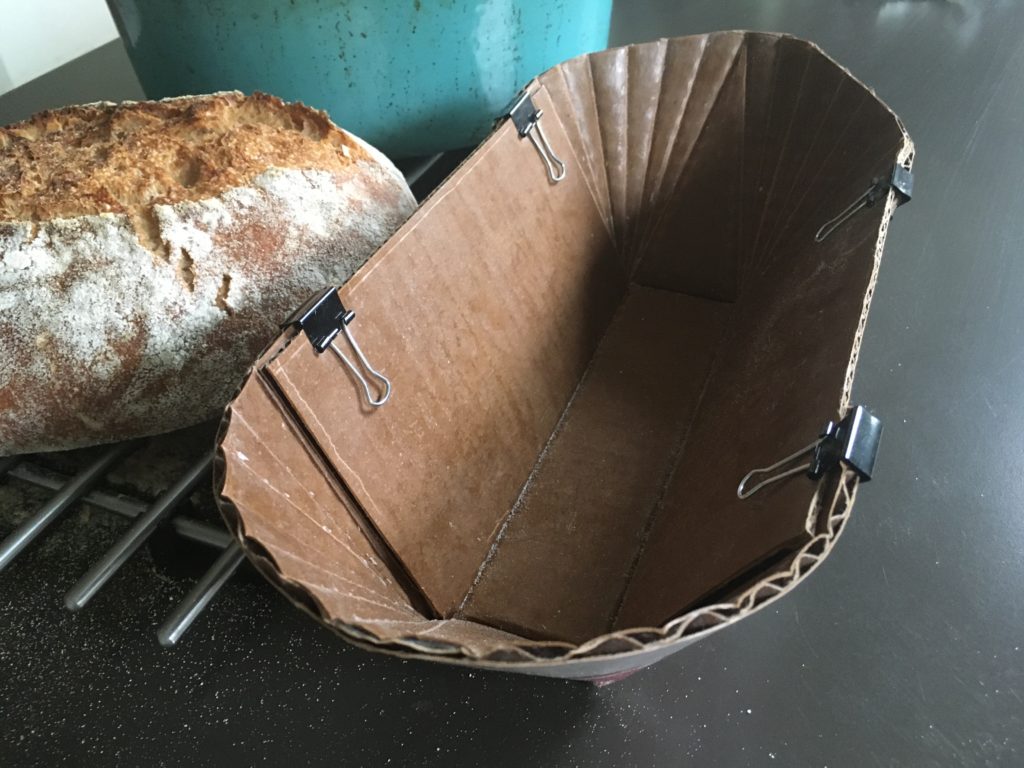
Then simply place the corners of the curved ends outside the body of the banneton, so marks A and B line up, and fasten in place. I used binder clips with the handles folded back, or I think you could quickly sew the corners in place with a few stitches.

Another fastening technique that might work here is to use a construction stapler with 1/2” staples. I do this when I want to staple the spine of pamphlets, or in other places too deep or thick for a regular stapler. Place the material you want to staple on something soft and thick, like several layers of cardboard, or on short carpet with a foam underlay. Shoot a staple, in this case from inside the banneton. Pull your project up off the soft stack and use needle-nosed pliers to bend the tips of the staple over.
And there you have your Cardbanneton! Line it with a tea towel, sprinkle the towel generously with rice flour, and lay your shaped dough in to rise.
You are a genius and a money saver.
Trying this right now 😀
Hope it works for you!
I am a seasoned diy-selfer and could not figure out an easy to do banneton. Chapeau!!!
Used ordinary cardboard from a box and covered it in 2″ packing tape. Instead of clips or staples used my hot glue gun. Both worked extremely well.
Also made a smaller one by removing just enough from the centre so the corners did not overlap.
Used Rasterbator to tile plan on to letter size paper.
Ah! I am so glad to hear this is useful to you. Clever hack with the packing tape—and good to hear about the glue gun. The edges of my cardbanneton are starting to compress and one of the small binder clips slides off.
Rasterbator is a cool tool, thanks for sharing that.
I was literally JUST trying to figure out how I was going to get around having to buy a bunch of banneton baskets. Thanks Ruben!!
[…] Make your own bread banneton out of cardboard […]